Fix Error "No New Transactions" when Importing Web Connect File
Have you encountered the 'No new transactions' issue while importing a web connect to file and are unsure how to proceed to resolve it? You don't have to be concerned because we've framed this article to address the problem.
This article shall equip you with all the relevant and updated knowledge regarding the No new transactions error and the assorted method to rectify the same. Just make sure that you go through this article till its culmination without missing out on any of the enlisted steps.
You might get the following error message on your desktop screen:
![]()
Reasons that contribute to the 'No new transactions' issue
You may come across this error due to any of the following factors:
- No new transactions in the web connect file.
- If the web connect statement includes dates that have already been imported into the company file.
- QuickBooks file got damaged/corrupted in some way.
- Transactions have already been imported.
Methods to Fix the QuickBooks 'No New Transactions' Error
In this section, we will assist you with all the reliable and simple-to-follow methods to get the QuickBooks ‘No New Transactions Found’ Error rectified.
Method 1: Double-check the dates
The overlapping date range of the transactions is one of the primary reasons why you get a QuickBooks Web Connect import issue. Ensure that you are not downloading and(or) importing transactions that have already been imported.
Method 2: Shift to the Register Mode
- Choose 'Preferences' from the 'Edit'
- Select the 'Checking' option from the left pane.
- Afterwards, choose the 'Company Preferences.'
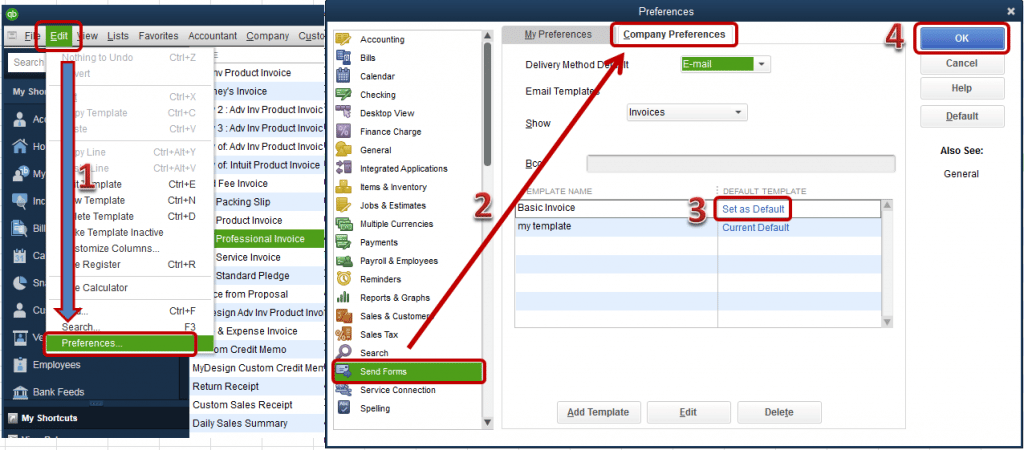
- In the 'Bank Feeds' section, choose 'Classic Mode (Register Mode).'

- Finally, press the 'OK'
Method 3: Download and Install Transactions Directly from Bank.
- Go to your Bank's website and log in.
- Save the .QBO file to your computer's desktop.
- Open QuickBooks and follow the subsequent steps.
- Select 'Utilities' from the 'File'
- Choose 'Import.'
- Now, move to Webconnect files.
- Head to the File location, select the 'file' menu, and then choose 'Open.'
- Follow the Import Wizard's instructions to finish the Import.
Method 4: Modify Identifier & then Reload the Files
Each transaction in the file has its own unique identifier, which can be modified to refresh the web connect files. The unique identifier ensures that no duplicate transactions are imported.
- Open the web connect file in a text editor.
- Once you have the file opened, choose 'Edit,' followed by 'Find.'
- Select 'Find and Replace.'
- Type '<FITID>' into the search box.
- Then, type '<FITID> 1' in the Replace field.
- Choose 'Replace All' and then 'Finish.'
- Select 'Utilities' from the 'File'
- Select 'Web Connect' from the 'Import'
- Check to see if the issue with QuickBooks not importing bank transactions has been fixed.
Method 5: Review the Web Connect
- Save the .qbo file to your computer.
- Right-click the file and choose the 'Open with' option.
- Access the file using Notepad or Excel.
- Look over this file for any possible errors. Remove any invalid characters, such as & and #, as well as any other invalid character strings.

- All Tags should have the following data:
- <STMTTRN> must have an end tag.
- <FITID> , <NAME> must have character length <= 32.

- The length of the MEMO field should not exceed 255 characters since it contains payee information that exceeds the limit of the NAME field.
- QuickBooks desktop will not import bank transactions if the.QBO file does not contain unique BID information.
- Find the BID information as per the QuickBooks version:
- Press the 'Ctrl + F' keys and search for your bank name. Please take note of the 5-digit number in the left column and Enter the same when prompted.
- Save the .QBO fil
- Before importing the .QBO file, create a backup.
Method 6: Deactivate, Create New, Merge and Finally Reactivate
- Turn off the Bank Feeds for a specific account.
- Create a new bank account by following the below-mentioned steps.
- Select 'Chart of Accounts’ from the 'Lists'
- Right-click in the Chart of Accounts window & then choose 'New.'
- For the Account Type, select 'Bank.'
- In the 'Account Name,' provide the name of your Bank.
- Choose Save & Close the Window.
- To merge the two accounts, rename the old account with the new account's name.
- Right-click the old account and choose 'Delete.'
- Select 'Edit.'
- Head to the Account Name field and provide the name of your new account.
- Choose 'Yes' from the 'Merge warning' dialogue box.
- Create the merged account for Bank Feeds.
Method 7: Check if.QBO can be downloaded in a Test Company File
- Choose 'New Company' from the 'File'
- Select ‘Express Star'
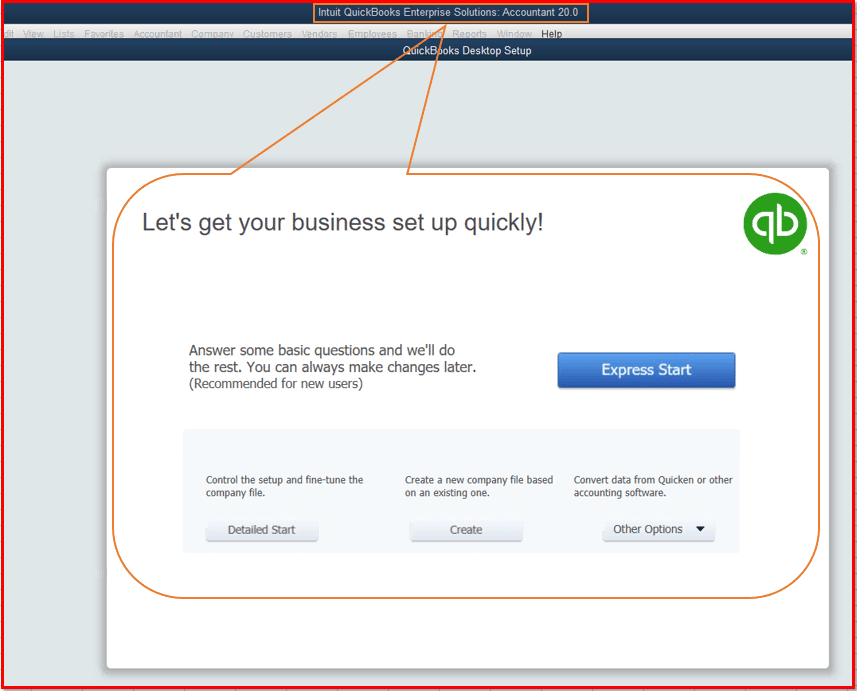
- On the new company file, add Chart of Accounts to the account that is showing the error.
- Create the 'Bank Feeds'
- To test the account, download the Bank Feed transactions.
If the QuickBooks Web Connect Import Error “No New Transactions” keeps lingering on despite the careful implementation of the above-mentioned methods, you can contact our 24/7 QuickBooks error support team via our helpline 1-800-761-1787 for indomitable assistance.
Our team of professionals will investigate why QuickBooks desktop isn't integrating bank transactions and will repair the issue as soon as possible.


Comments
Post a Comment